Create a custom role to assign to the Application
- Create a Custom Role that will be assigned to the application created for the Valtix Controller. The Custom Role gives the application permissions to read inventory information and create resources (e.g., VMs, Load Balancers, etc.) The Custom Role can be created in multiple ways. One of the easiest ways is to navigate to your Subscription and click Access Control (IAM)
- Click on Roles and on the top menu bar above Roles click +Add > Add Custom Role
- Give a name to the Custom Role (e.g., valtix-controller-role)
- Keep clicking Next until you get to the JSON editing screen
-
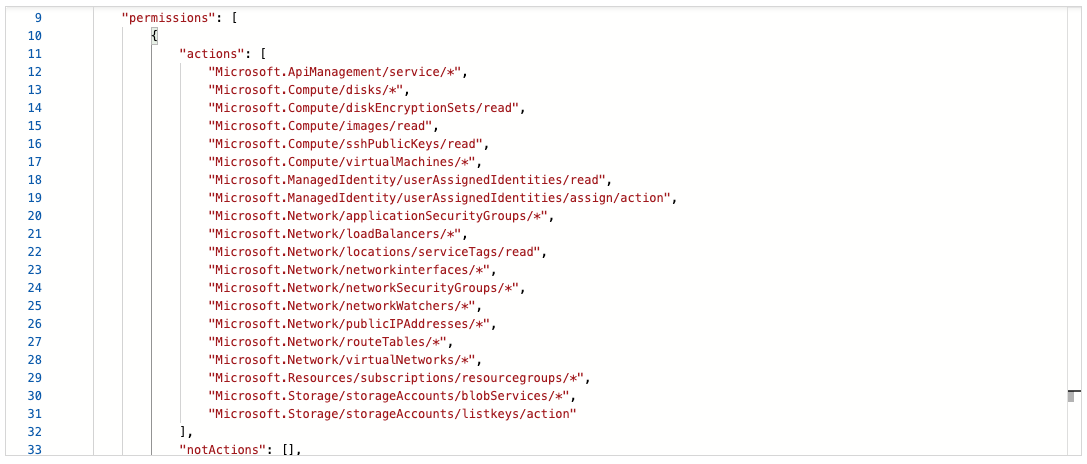
Click Edit on the screen and in the JSON text, under the permissions -> actions section, copy and paste the following content between the square brackets (no need to maintain the indentation):
"Microsoft.ApiManagement/service/*",
"Microsoft.Compute/disks/*",
"Microsoft.Compute/diskEncryptionSets/read",
"Microsoft.Compute/images/read",
"Microsoft.Compute/sshPublicKeys/read",
"Microsoft.Compute/virtualMachines/*",
"Microsoft.ManagedIdentity/userAssignedIdentities/read",
"Microsoft.ManagedIdentity/userAssignedIdentities/assign/action",
"Microsoft.Network/loadBalancers/*",
"Microsoft.Network/locations/serviceTags/read",
"Microsoft.Network/networkinterfaces/*",
"Microsoft.Network/networkSecurityGroups/*",
"Microsoft.Network/publicIPAddresses/*",
"Microsoft.Network/routeTables/*",
"Microsoft.Network/virtualNetworks/*",
"Microsoft.Resources/subscriptions/resourcegroups/*",
"Microsoft.Storage/storageAccounts/blobServices/*",
"Microsoft.Storage/storageAccounts/listkeys/action",
"Microsoft.Network/networkWatchers/*",
"Microsoft.Network/applicationSecurityGroups/*"
This is an example screenshot of how the Custom Role JSON actions should look after pasting the above content:
-
Optional - If you plan to use multiple Subscriptions with Valtix, you must edit the JSON at assignableScopes to add another Subscription line or change it to * (star) so the Custom Role can be used with all Subscriptions
- Click Save at the top of the text box
- Click Review + Create and create the role
- Once the Custom Role is created return to Access Control (IAM)
- On the top menu bar, Click Add -> Add role assignment
- In the Role dropdown, select the Custom Role created above
- In the Assign access to dropdown leave it as the default (Azure AD user, group, service principal)
- In the Select text box, type in the name of the application created earlier (e.g. valtixcontrollerapp) and click Save
- In the Subscription page, click on the Overview in the left menu bar and copy the Subscription ID to the notepad
Required Values For Valtix Controller Onboarding
Make sure you have the following information before proceeding further:
- Subscription ID (from subscription overview page)
- Directory (Tenant) ID (from the Azure AD app overview page)
- Application (client) ID (from the Azure AD app overview page)
- Client Secret (Copied when the Client secret was created)